How To Pour A Concrete Slab For A Shed

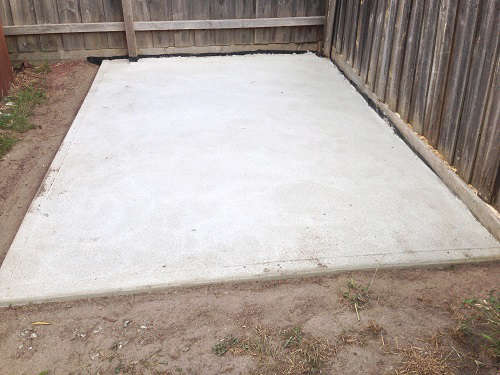
Finished Slab
Quick Navigation
A CONCRETE SLAB is one of the more expensive ways to prepare your site. However, if done correctly it can also be the best. A slab will keep the shed level and prevent grass and weeds from growing both under and around your shed.
It's also the best to work on, the strongest and longest lasting foundation for a shed. So if you like to only do something once, then this is the foundation for you.
If your still unsure, we have compared the different shed foundations against each other here. Otherwise let's get started!
Disclaimer
You will need to check with your local government about pouring your slab, regarding your local laws.
Tools You'll Need
| Tape Measure | Marker Pen | Hardwood Pegs |
| Mallet/Hammer | Lengths of Timber | Screws & Drill/Nails & Hammer |
| Wheelbarrow(s) | Spade/Shovel | 72 Inch Level/Straightedge |
| Masonry String Line | String Line Level/Laser-Level | Hose Connector & Hose |
| Concrete Hand Tools |
Materials You'll Need
| Steel Mesh | Bar-Chairs |
| Gravel | Concrete |
| Builders Plastic (Maybe) |
Planning for your Slab
The first step is to mark out the size of your slab. Measure off something (the fence or side of your house) and use that as a reference point.
Once you have the size, grab your hardwood pegs and stick them into the ground at the corners. Put them in firmly because you'll be digging around them later.
When you have the size, you need to get the desired height. The two most popular ways to do this are:
1. Run some stakes and a string-line at your desired height. Then use a level string level to get the height right the rest of the way around (Note mark the stakes with a marker after you have got everything where you want it. Just in case someone steps on the string)
2. A laser level – You still need to use pegs with a laser level to have something to mark. When you've marked all your pegs, grab out your string-line and run it around all of your marks.
How Much Concrete?
At this stage it's a good idea to work out how much concrete your going to need. A few simple calculations will help here. LxWxH. Seeing you know your Length and Width, you can adjust your height if you need to, to match how much concrete you are ordering.
In my experience, ordering concrete from a mini-mix comes in a minimum of 1 cubic meter. The size of my slab is approx 3.4m x 2.3m. Multiplying this by .125 (12.5cm) gave me .9775 cubic meters which is very close. A little too close for my liking. We ended up digging the hole 14cm deep, added 2cm of gravel and only had a spadeful of concrete left at the end!
It's always best to have more and not want it than the other way around, so keep playing with the figures until you have 5-10% extra, just in case.
If your slab is large then you shouldn't have this problem. Just add 10% onto whatever your cubic meter figure came in as, then order that.
Mark Out The Slab
It's almost time to dig your hole.
But first we need to work out how deep to dig your hole. Your concrete slab should be at least 4 inches deep (100mm). But you should also allow some room for the gravel.
The gravel will help the concrete sit on something a bit firmer than dirt and the gravel will compress to make a base that is quite hard.
Depending on how much gravel you have/order you might want to leave 1/2inch to 1 inch (10-25mm)
For my example, we had about 1/5th of a cubic meter in gravel. This gave us the 2cm across the bottom that we wanted.
So far you should know how deep you need your hole to be for the concrete (LxWxH= the amount of concrete you have – 5-10%)
& the extra depth you need in your hole to allow for the gravel.
Dig Your Hole
Make sure the bottom is flat and the height is all uniform all the way around.
Dig a little outside your perimeter, this will give you room to place your form-work later.
After you have dug your hole, water it. This will help the dirt settle.
Form-work

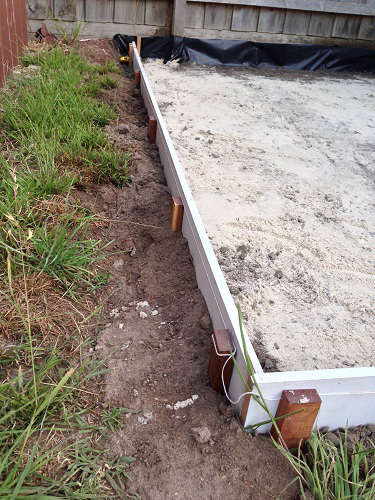
The form-work here is in place and screwed together. The back fence acts as the form-work at the back, while the builders plastic holds the concrete in
Next step is to ‘box off' or make some form-work.
Form-work is the container for your concrete slab. Kind of like how a glass keeps water in it, the form-work keeps the concrete in it.
If your slab is going to be 4 inches (100mm) then it helps to have at 4 inch timber for your formwork. If you don't you will need to use the builders plastic on the inside and run some dirt up to the form-work so the concrete doesn't spill out. It also helps to staple the builders plastic to the form-work so it doesn't move.
Screw or nail your formwork together at the edges, then use your hardwood pegs to keep it in place. Over long stretches the timber might bow, so use the pegs on either side to keep it straight. (When you are pouring your slab, the concrete will try to push the form-work out. That's when you take the inside pegs out.)
Once the form-work is in, then you can remove the string-line. The top of the form-work should be the top of your slab, where the string-line was. If your timber is straight and true, then you can remove the string-line before you put the form-work down.
Gravel
Once the form-work is down and secured its time to put the gravel in.
Put it in as even as you can, while keep watching your heights around your form-work.
TIP – after the gravel is down, water it. This will help the gravel condense and stop the dust from blowing everywhere. It is also a good idea to water the gravel just before you put the slab down.
Steel Mesh

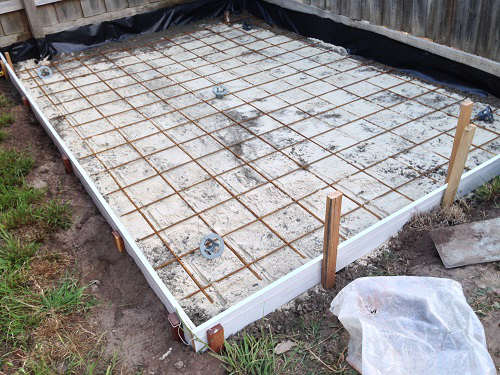
The steel mesh covers almost all of the area of the slab. The bar-chairs are in place and need to be stood up.
Before the concrete comes, or gets made we need to have the mesh ready to go.
The mesh is going to be different depending on your use for the shed. If your shed is like mine (just a tool shed) then you wont need any heavy steel. Standard (thick mesh) will do.
However, if you want to put your car in here then you will need some stronger steel. 1/4 inch bar run where you are going to park your car, and anywhere the car is going to get driven over (like a driveway) is a must. And you will also need some mesh to cover the rest of the slab.
The easiest way to cut this is with special cutters, but you can use an angle grinder (recommended) or a hacksaw (not recommended) if you are really stuck.
When cutting the steel mesh you want to leave it at least 4 inches from any side. Having steel poking out of a slab is bad. It will rust and get into the concrete which will cause concrete cancer (your slab will slowly crumble from the inside.)
The mesh also shouldn't sit on the ground. it should be suspended in the slab, and the easiest way to do this is ‘bar chairs'. You could also get some old bricks or something else concrete and put them under the slab, but the bar chairs are quite cheap, and wherever you got the mesh will sell them. You can also set them at different heights which can come in handy
Checklist so far
1. Form-work level, and at correct height.
2. Form-work is strong
3. No gaps in form-work for concrete to escape
4. Mesh in and at least 4 inches in from form-work around all sides
5. Mesh raised to about the center height of slab
Concrete Pouring Day
TIP – Don't do this on your own if you can avoid it. On a hot day time can be against you so having two people means the job gets done a lot faster.
TIP – Wet everything you are going to use in the concrete first. Your level, shovel, etc. this will make cleaning up a lot easier, the concrete doesn't stick as much to wet items.
The easiest way is to get concrete delivered. That way you just run your wheelbarrows to and from the mixer truck and dump them as evenly as possible.
If you have hired a small mixer and bought the materials you will need to get the mix correct, and there are other things you have to worry about. And I don't think its any cheaper
As of writing this, the concrete for my slab cost me $225 AUD delivered. I'm sure if you Googled concrete mini mix in your area you could get some quotes.
Preparation
1st thing, get out and water that gravel – you'll also need a hose nearby for later.
It's also a good time to get all your tools ready for later on so there's no mucking around. Like your hand tools, straightedge/level etc.
Spread The Concrete
Start dumping your concrete as evenly as you can. Make sure that the form-work doesn't get damaged. (We used an old board and a few bricks to create a ramp that went over the form-work)
Firstly use your shovels to move the concrete around. Don't be afraid to poke and prod, because that will help get any air bubbles out. The pros use vibration tools on big sites to do the same job.
This video shows how they pour and level a concrete slab on a commercial scale
Leveling Your Concrete Slab
Then get in and start evening it out.
Serious landscapers have a huge straight edge which they use to level off concrete. You can get away with a long level (2m)
The best way I've seen to even out concrete is start at the back and work your way forward. With the level or straight edge, rock it forward and back in your hands until you can sit it on the concrete and get a flat surface. This may take a couple of times so be patient!
It's important to get the bit you are working on right, then move on.
Once It's Flat and Level
Once the slab is flat, and you are happy with it it's time to clean your tools that you have used.
As your working, you will see the water start to rise to the top of the slab, this means it is starting to dry.
Concrete Finishes
Concrete finishes should be applied when the top of the concrete is semi dry. After you pour the slab and level it the water will rise to the top. This gives a glossy type look to the concrete. After this has died down, and the water has evaporated a little then it's time to put on your finishes. The time it takes for this to happen varies on the temperature, and how much sunlight is on the concrete. On a coolish day with shade over the concrete it can take a few hours to get to this stage.

The slab in the picture is finished with a screet finish. This isn't necessary, you do need a trowel to be able to do this, (something like this) however the corners are rounded off, which i recommend. (will save the edges from chipping later)
To do this you go around the end with a special tool. If your half decent with metal work you could make one yourself, or you can just get one from your local hardware store or online here. To use it just stick it in between the slab and the form-work and let the tool do the rest. You need to go up and down a few times. As you can see on my slab the corners are a little indented on the slab. It looks nice in my opinion.
There's one more thing we need to cover before the concrete starts drying and that is dummy joints.

Over time this concrete has moved, but still looks good because any cracks are concealed by the dummy joints
If you have a slab that is an L shape for example, you will want to put in a dummy joint. To put one in, you use a tool like this. It's a ‘Concrete Groover' and puts a groove in the concrete. To get a straight line, when you are doing your finishes put your level on the concrete and run the Groover along the level, like you draw a line with a ruler.
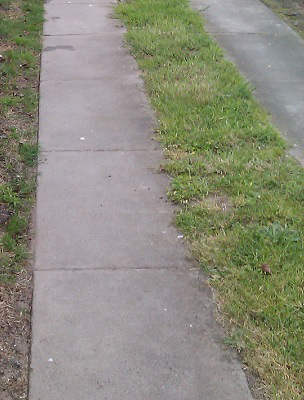
Running these dummy joints means if the concrete is going to crack, the crack will be restricted to the dummy joint. You can see where we put dummy joins in our driveway slab for reference.
TIP – If your slab is too big and you can't finish it by standing on the side and reaching in, you might need to invest in some kneeler board pads (like these). They displace your weight over the concrete keeping it flat and level whilst it hasn't dried. This way you can reach over and put your finish and dummy joints in.
24 Hours After Pouring
You want to be pouring on a nice day, but sometimes rain can be forecast. If rain is forecast on your day, then it's a good idea to cover your slab with something. We used builders plastic and stapled it to the fence.
You could use tent poles or anyhting that you have as a makeshift shelter. It is best of course to try and avoid these days.
After 24 hours you can walk on your slab, although it will take about 1 month for your slab to ‘fully harden' (apparently it took the hoover dam 2 years to fully harden).
If your just building a shed on it, you can start doing that in 2 weeks. Although i would keep my car off of it for the full month.
Thanks for reading,. Any questions, comments or queries on how to pour a concrete slab for a shed then please use the contact us page!
Related Articles:
