How to Build a Patio – The No Nonsense Guide to Creating an Amazing Paved Outdoor Area

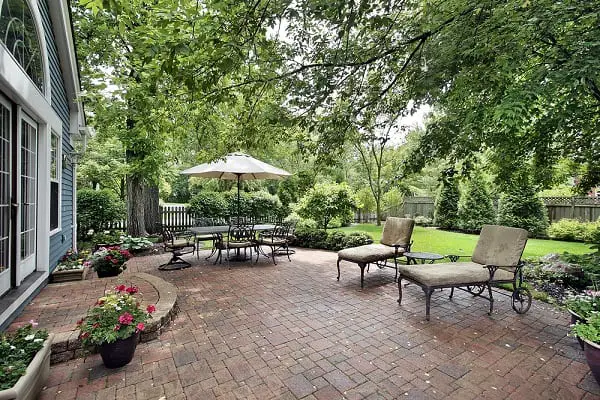
A patio can be the perfect place to entertain or relax on a nice day
Quick Navigation
SUMMER TIME MEANS PLENTY of warm sunshine, barbecues, and being able to sit outside in the evening at the end of the day to enjoy a cool drink and good company. But, without a deck or patio for your grill, a few chairs, and maybe a table, where is everyone going to sit? Here I am going to cover how to build a patio for your yard you and your family can enjoy for many years to come.
A Plan of Action
The first step is the planning stage. Not only do you need to decide how big you want your new patio to be, but you need to decide what materials you will be using for the final top layer.
Size: When I was trying to determine the size of my backyard patio, I factored in room for several chairs, a chaise lounge or two, a small table, and a fire pit. Always allow for more room than you think you might need to ensure you have room for extra guests when the time comes.
Ideas: After you know the size, i think it's best to have a look at what others have done. Here are plenty of great examples of patios and the landscaping around them.
Materials: There are a few great materials to choose from, including bricks, pavers, and natural rock. Each of these has its own advantages and disadvantages based on looks, durability, and how much work you are willing to put into building your new patio. You should also consider how you plan to use your patio and whether you plan to use it all year round.
Choose Your Location
Now that you have an idea of what type of patio (size, materials) you want to build, the next step is choosing the best location for it. There are several things you should consider as you look for the perfect spot in your back yard to build.
How Much Shade Will You Get?
Unless you live in an area where the sun never shines or you have zero shade trees in your yard, try to pick an area that gets shade for at least part of the day. If you don't have anywhere in your yard that gets shade, consider planting a few shade trees, shrubs, and plants to help out.
Does the Area Drain Well?
The last thing you want is a patio that spends a large part of the time sitting in standing water every time it rains. Be sure to pick a spot in your yard that drains well to ensure your patio remains high and dry.
What Kind of Slope Are You Working With?

A small amount of slope, say around 1/4 inch per foot is just fine, it will help the water to run off and away from your patio. If the area has more slope than this, you may need to grade the soil or build some form of retaining wall that will let you set the appropriate slope.
Issues with Digging
Start by looking at any trees and their root structure in the area you plan to use, avoid building directly under the trees. Be sure to contact your local utility companies by dialing 811 before you start digging. Most will send a surveyor out to mark water lines, gas line, underground power lines and anything else you might damage by digging at no cost.
Plan Your Delivery Route
Most of the materials used to make a patio are very heavy by nature. You need to have a delivery route planned that will reduce the amount of manual labor needed to get them to the job site. The sand and gravel you need for the base will typically arrive in dump trucks that may be too heavy for your driveway or yard. If you are building a large patio, you may want to ask the supplier to deliver the materials in a smaller truck or palletized with a skid loader to help get them where you need them. This will be much better than having to haul everything one wheelbarrow load at a time.
Create a Working Plan
Now that you know where you are going to build your patio and how big it is going to be, it's time to create a working plan. Trace out the area you plan to use for your patio, including any trees, shrubs, buildings, walkways, and gardens.
Then experiment by drawing in different sizes and shapes until you are happy with your design. Doing this will not only help to ensure you are happy with the final shape and size, but it will also let you experiment with different pavers and bricks to see which one will work best. It will also let you try out different patterns.
Building a Solid Foundation
Just like your house and garden shed, your new patio needs a good solid foundation. Remember while the only thing you see is the final layer of pavers or bricks, it's what's hiding underneath, i.e. landscaping fabric, sand, and gravel, that is responsible for making it stable and holding it all together. If the place you are buying your pavers, bricks, or stones does not carry gravel or sand, you can find several suppliers in your local Yellow Pages.
Landscape Fabric:
Landscaping fabric performs two vital functions in the construction of your patio. The first is to help stabilize the layer of soil below the gravel by allowing water to drain through. Use the widest fabric you can find. Secondly, it helps to keep weeds from growing up through the gravel and sand before finding their way through your pavers.
Gravel:
Gravel forms the semi-solid base for your patio. It helps to ensure that any water buildup can flow into the ground rather than building up. Depending on the type of soil you have in your backyard, you may need anywhere from 4 to 10 inches of pea gravel.
Sandy soils tend to need less gravel than soils loaded with clay or organic matter. Gravel is typically sold be the cubic yard or ton. One cubic yard of gravel will provide you with a 6-inch layer that covers 50 square feet once it has been compacted. One cubic yard of gravel typically weighs in at around 1.5 tons.
Sand:
You will need a layer of "coarse washed sand" to cover the gravel to a depth of approximately 1 inch. This layer of sand is used to create a "setting bed" for the pavers, bricks, or stones you plan to use for the surface layer. You can also use the sand to fill in any gaps between them and provide a smooth final surface.
Tools You Will Need
Putting in a new patio takes a lot of effort and a relatively long list of tools to get the job done right. Here is a list of the tools you should have on hand:
- push broom
- rake
- level (both 4-foot and line-level styles)
- work gloves
- rubber mallet
- shovel
- safety goggles
- small sledgehammer
- tape measure
- shovel
- tamper (rent a powered version from your local equipment rental store)
- wheelbarrow
Materials You Will Need
As with any major project in your garden or yard, there is always going to be a list of supplies needed to get the job done. Here are the basics for you:
garden string
paving stones, bricks, or rocks
gravel (pea gravel is best)
stakes
sand
landscape spikes
Digging Your Patio In
Now for the fun part, it's time to mark out your new patio's dimensions on the lawn and start digging. There are a couple of ways you can go about doing this, use spray paint to mark the borders, use a series of stakes and string, or even an extra-long garden hose or two. The nice part about using any of these to mark the border of your patio is that they can be used to create virtually any shape.
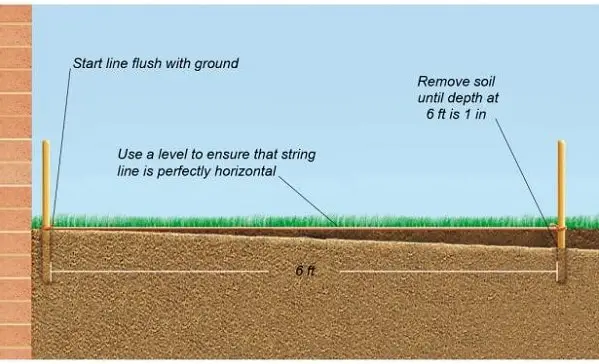
You should also use a length of string running from end to end in the middle running down the slope you need for the water to drain. Remember, you will need a drop of 1 inch for every ten feet in length if you want the water to drain properly.
Now for the real fun, you need to dig a hole in the shape of your new patio that is about 10 inches deep to make room for the landscaping fabric, gravel, and sand, while leaving enough room for the final layer of bricks, stones, or pavers to sit just above the ground when set.
One last thought here, you are going to be digging out a heck of a lot of dirt and need to have somewhere to dump it sorted out before you begin. Not sure what to do with it? Why not create a raised garden or fill a few planters instead of paying someone to haul it away?
Building the Foundation of Your New Patio

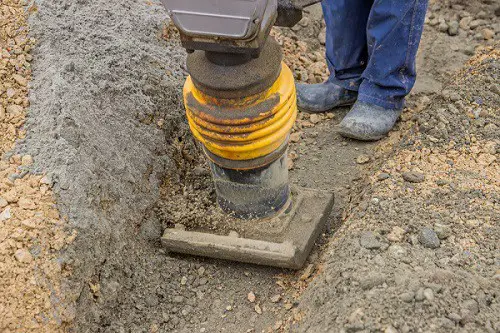
The foundation of your new patio starts with tamping the soil down to form a smooth solid base. The best way to do this is to rent a gas-powered tamper. Not only will this make the job go faster, but it does a better job and you will find it easier to keep the necessary drainage slope.
Next, comes laying the landscaping fabric down to cover the entire "floor" area. If you need to use more than one piece, be sure to overlap by at least 6 inches to avoid bleed through.
Add your edging at this point, making sure that the top of the edging will sit just below the top of the final layer of your patio. Use aluminum edging if possible so that your string trimmer does not destroy it the first time you edge the lawn
Next, pour in the gravel and level it with a rake to create a smooth surface that continues to maintain the drainage slope. I recommend using pea gravel as it is big enough to allow for water drainage but small enough to be raked smooth. The layer of gravel should be approximately six inches deep.
On top of this goes a layer of sand that will be thick enough to ensure the bricks, stones, or pavers you plan to use sit about 3/8th of an inch above the edging. This way when you run the tamper over the final layer it will sink down to where it will be flush with the edging.
Laying the Final Layer of Bricks, Stones, or Pavers

The final step in learning how to build a patio involves laying the bricks, stones, or pavers you intend to be the finished patio. There are several ways to mark out the pattern you plan to use, the most common of which involves using a number of stakes and a chalk line like you would use to mark sheetrock. The idea is to lay out the lines to match the pattern you drew out in your original paper plan. This could be a brick herringbone, paver checkerboard, or unique stone pattern. There are dozens of patterns to choose from online.
Finishing Your New Patio
You should have saved some sand aside for the final step. Start by using your rented tamper to bricks, etc. into place. Warning, (as I found out the hard way) if you are working with bricks or pavers that are less than 2 inches thick, DO NOT tamp them as they will crack and break!!!
The next phase involves spreading the sand over the top of the final layer and using a push broom to force it into the cracks. This will help to lock the surface of your new patio in place and help keep weeds from growing in the cracks.
Finally, add any shrubs, planters, trees, or flowers around your patio, set out the chairs, light a fire in the fire pit and relax with a well-earned cold one. You certainly deserve it and your family will enjoy the fruits of your labors for many years to come.
Living With Your New Patio
Once your patio is finished it's time to deck it out with furniture. To get the most out of it in all weather you might want to consider investing in a patio heater. These are great for giving you back your outdoor space when the weather cools down.
Final Thoughts
I hope you have enjoyed reading about how to build a patio as much as I have enjoyed putting this information together for you. Remember it takes time, planning, and hard work to build a patio that will last for many years to come, but once you and your family can sit out and relax on it, it will all be worthwhile.
I hope you have learned something about how to build a patio
If you have any information you would like to see here, please contact us here.
Thank you for reading this.
Related Articles:
