How To Do Shed Roof Framing Yourself

Learn how to build your own shed roof frame…
Quick Navigation
Anyone who has ever stood and watched professional carpenters frame in a house or roof has probably stood in awe of the “amazing” skills it takes to put all the pieces in place perfectly.
The reality is that shed roof framing is nowhere near as complicated as you might think. If you are like me, you probably have a reasonably good idea of how to build most of your shed. That is except for the crowning glory, the shed roof.
In truth framing in the foundation and the walls, adding doors and windows, these are all relatively straightforward, simple tasks.
- For many people, the idea of having to do the shed roof framing is a little bit on the scary side.
- What gables, gambrel style roofs, how do you calculate the angle for the trusses, and what about the rafters?
- Should you build a “stick frame” roof, make your own trusses, or buy them ready built?
- What type of roof is going to provide the necessary strength?
- How do stick built and truss style roofs differ?
The most important thing to remember is that if you can frame in the foundation and the walls of your shed, there is no reason why you can’t also handle the shed roof framing.
To be sure using pre-built trusses is the easiest way to go, but with a little practice, you can create a jig that can be placed on the floor of your garage or your back deck that can be used to build a set of trusses for your shed that will be perfect.
It All Starts with the Right Tools and Equipment
No matter whether you are talking on baking a cake, changing the oil in your car, or shed roof framing, it all starts with having the right tools and equipment for the job.

In most cases, simple hand tools are good for most of the work, but there are going to be a few power tools that will either be necessary or will make the job much easier and go more quickly.
Let’s take a look at the tools you are going to need:
Safety Equipment
- Safety goggles or glasses for each person working on the project
- Leather gloves to protect your hands
- Ear plugs for use with power tools
- Knee pads
Tools You MUST Have
There are just some tools you can’t build anything without. This list is only to get you off to a good start, I am sure there are a few I haven’t listed or you have your own favorites to add to the list.
The most important thing to remember is to use the tools you are most comfortable with as this will make the project go much more quickly.
- Tape Measure
- Clawhammer
- 4 or 6-foot level
- Circular saw
- Power drill
- Sawhorses (at least 2)
- Nail set (punch)
- Speed Square
- Extension ladder
- Step ladder
- Heavy duty shears or scissors
Tools it Would be Nice to Have
While hand tools are all well and good, they are not the most efficient way to get the job done. It can take hours to hammer in all the nails needed to take care of all the foundation, wall, and shed roof framing, not to mention the number of blisters you are likely to end up with if you try.
You can pick up a small pancake compressor for under a hundred bucks from Amazon or your local discount home improvement store. Framing and roofing nail guns can be found for around the same price.
If you are going to use pneumatic nail guns, be sure to read all of the safety warnings and instructions before using them. You should never use a pneumatic tool without the proper safety equipment (goggles or safety glasses) and take a little time to learn how it works on scrap wood before you try to take on your shed roof framing.
- Air compressor
- Air powered framing nail gun
- Air powered roofing nail gun
- Air powered staple gun
- Electric miter saw
Materials You Will Need
While this might seem obvious, there are certain materials needed to build any kind of shed roof framing. For the most part, your shed plans should come with a list of the materials needed for each part of the shed from the foundation to the roof.
One of the most important things to consider when buying your lumber is to take a little extra time and check each piece for straightness, excessive knots, holes, chips out of the edges, and cracks that can and will have a detrimental effect on your finished roof.
Here is a short list of common materials you might use in building your roof:
- 2 x 4
- 2 x 6
- Plywood or chipboard sheathing
- Roofing felt
- Shingles or metal roofing
- Drip edging
- Ridge or gable vents
- Truss plates (used to connect the individual truss pieces together)
- Hurricane tie-downs (metal plates designed to solidly connect the trussed to the walls)
Different Types of Roof
Beyond the standard flat roof or single sloped roof, the most common styles of shed roof are gable, gambrel, skillion, and salt box.
Each of these styles has their advantage both in design and construction. All of them make a good choice for your garden shed.
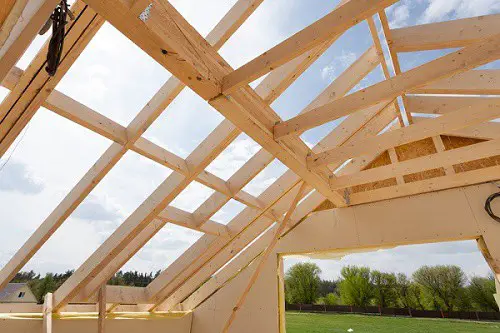
The Gable Style Roof
A gable style roof is considered to be the easiest type of shed roof framing to work with.
Essentially you will be building a series of triangular shaped trusses based on the pitch of your roof. You will need to build a number of trusses based on the length of your roof.
This roof style is similar to those seen on the average house with a single peak in the center and one slope on either side

Image courtesy of Renovation Headquarters
The Gambrel Style Roof
The gambrel style roof is a lot like the old “barn” style roof. It has two slopes on each side of the peak.
The main idea behind this type of roof is that it provides you with a huge amount of storage space, especially when the walls are six feet tall.
It is one of my favorite roof styles and is also perfect for adding a cupola to for added ventilation and appearance.

Image Courtesy of How To Build Plans
The Saltbox Style Roof
The saltbox style roof is also a dual slope roof like the standard gable roof in that it only has two slopes. The big difference is that the front slope is shorter than the rear slope. It adds a lot of style and charm to your garden shed.

Image courtesy of Zygor Game Guiden
The Skillion Style Roof
This is a single slope roof with a peak at either the front or rear of the shed. It is simple to construct and considered to be quite strong.
These are typically the easiest types of roof to build and take the least amount of materials and time. Watch a skillion roof being built here.
All of these common roof styles require some form of truss to be built in order to support the covering and any load such as snow weight.
The one good thing is that once you have decided on the roof pitch all you have to do is built the first truss and use it to create a jig you can use to build the rest of the trusses so that they all match.
The Basic Step-by-Step Construction Process
If you have never built a shed before, let alone worked with any type of shed roof framing, you might be surprised at just how easy it really is.
The first step is to determine the desired pitch of your shed roof. As complicated as this might seem and as many places that will try to tell you that you need to fully understand complex geometry, the reality is much simpler.
Roof Pitch
Roof pitch is the angle of slope of your roof based on the amount of rise versus the distance from the edge of the roof to the center.
Your roof must have a minimum pitch of at least 3-12. What this means is that for every 12 inches of horizontal run your roof needs to rise at least 3 inches.

You can use a roof pitch calculator to determine your pitch and make the necessary adjustments to your design.
Bear in mind the steeper the pitch the more likely your shed roof will be able to shed rain and snow.
Build the Trusses
Now that you have the roof pitch calculated, it’s time to measure the lumber and build your first truss.
This is where you need to understand basic trigonometry in that in an equilateral triangle there are 3 sides, let’s call them a, b, and c. Basic Pythagorean theory states that the length of a² + b² = c². Thus, if side a is 3 feet and side b is 4 feet then the length of c should be 5 feet.
You can substitute any numbers into this equation and figure out the length of side c which is the longest run.

Once you have created the basic truss pattern, you can cut and lay out the first truss, which you will use as a pattern to build the rest.
There are two ways to connect the pieces together, the first is to overlap the boards and either screw or nail them together. The other is to use metal plates available at most hardware stores and home improvement stores to join them in a single flat truss.
Both methods will get the job done, however, the metal plate butt joint method tends to be stronger and is better suited to areas with a lot of snow or high winds.

Image courtesy of Wonder How To
This cool video will show you how to build gable style shed roof framing.
How the Weight is Supported
The way in which the weight of the roof itself and any rain or snow load is supported varies based on the design of your roof and trusses.
In a skillion style roof, the lumber provides most of the support with the use of spacers placed between the long run of roof beam and the rafters. These roofs are relatively strong and inexpensive to build.
In a standard two slope roof, the weight can be distributed in a couple of ways. For the most part the weight is supported by the triangular shape, however, one the ends there are supports running from the beams or rafters up to the top angled board of the truss.
The same can be said of the gambrel style roof. But the skillion style used supports like this across the entire structure, making it exceptionally strong.
Understanding Snow Load
According to roofing experts, snow load is the amount of additional force or weight of the snow and ice that is pressing down on the roof. There are several factors that must be taken into consideration when trying to calculate snow load, including:
- Density
- Accumulation
- Variations in temperature
- Mixed moisture
Bear in mind that a single inch of snow can weigh from 1/4 lb. to 3/4 lbs. per square foot. A single inch of ice comes in at just under 5 pounds per square foot, this is approximately 5 times the average weight of the same amount of snow.
Doing the calculations can be extremely confusing unless you are an expert in the field. The person doing the calculation has several factors to consider:
- Recent ground snow information provided by the National Weather Service
- The shape of the building including the roof and any obstructions on the roof
- How much wind the roof is exposed to
- The application of the building and how many occupants it has
- The thermal values of the building

You should use a snow load calculator to help you get in the ballpark and ensure your shed roof framing is going to be strong enough to take on your worst winter weather.
Installing the Trusses
All roof trusses must be properly installed, but don’t worry this is not as difficult as it seems. In this video, we see standard gable roof trusses being installed.
The most important thing to remember is that all trusses must be installed perfectly vertical for them to be effective.
Installing the Sheathing
Once the trusses are built and in place, the next step is to install the sheathing.
This is done by installing a number of sheets of either plywood or particle board over the top of the trusses. Not only does this give you somewhere to attach the roofing felt and shingles, it also adds to the structural integrity of your shed roof.
Follow the steps in this video to learn more about installing the sheathing.
Finally, the Shingles
Now you are ready to finish your shed roof using standard asphalt roofing shingles. The shingles will keep rain and snow at bay, help to reflect the sun’s UV rays, and put the finishing touch on your garden shed.
In this video, we see how to install the roof felt, the drip edge, and the shingles to create a complete roof that will last you for many years.
To Top It Off
I hope you have enjoyed this brief tutorial on shed roof framing and that you have learned something from it.
The most important things to remember are that you need to follow your shed plans to the letter, everything needs to be square, use plenty of nails or screws, and most of all be confident in your ability to get the job done.
You don’t have to be an expert carpenter to build roof trusses or install a solid functional roof for your shed, just have the patience to take your time and get the job done.
I have tried to give you the information I found useful during the construction of my garden shed, much of which I wish I had had when I started to build my shed. Some of which I learned by trial and error.
The good news is that in the end this information along with the videos can help you build a garden shed that can stand up to years of rain and snow and will serve you well.
I hope you have enjoyed reading this and it has helped you learn how to build the best possible shed roof framing for your shed.
If you liked what I have put together for you here, please let me know.
Let everyone know you enjoyed reading this on Facebook, Twitter, and Pinterest.
Thank you for reading this.