The 10 Most Popular Options for Shed Ventilation Reviewed – (and the Pros and Cons of Each)

Quick Navigation
VENTILATING YOUR SHED IS important no matter what the time of year.
No matter how hard you try to ignore this simple fact, the reality is that your shed is too hot in the summer and too cold in the winter.
If you are not sure if this is true, then think about all the times you refused to work in it for these exact reasons.
Along with temperature, a non-ventilated shed leads to a buildup of mildew and chemical fumes that go a long way towards making you sick. Proper ventilation is the best way to avoid these problems and many more.
The Problems Associated with Lack of Ventilation
As noted above, there are a number of potentially serious problems associated with not having proper ventilation in your shed.
- HEAT during the summer months, the inside of your shed can become a virtual oven. This can turn your shed into a work space you never want to go anywhere near.
- COLD: On the other side of the coin, if your shed is too cold, you still aren't going to get anything done in there. Not to mention those pesky chemicals and supplies, many of which don’t like the cold any more than you do.
- CHEMICALS such as paint and cleaning supplies you have stored in your shed can cause breathing issues or dizziness when kept in an enclosed area
- HUMIDITY: Depending on where you live, humidity can be a big problem. In your shed excess humidity can lead to mildew and excess moisture buildup. Depending on the materials your shed is built from, this can lead to rot and rust that you may not notice until it is too late.
- EXCESS MOISTURE/CONDENSATION: Excess moisture can create mold and mildew and have a seriously adverse effect on everything in your shed, ruining much of it. This, of course, will result in your having to spend a fortune replacing everything that has been damaged.
How to Make the Right Choice – First Time
Finding the right type of shed ventilation involves looking at the size of the shed, the materials it is made from, and what you plan to use it for. At the same time, you need to consider the average high and low temperatures where you live and the typical humidity levels.

The local climate will influence what type of shed ventilation will suit your shed
If you use your shed for nothing more than storage a simple ridge vent or non-powered gable vent might be enough. On the other hand, if you plan to work in your shed or live in an area where the humidity is high, a powered vent would make a much better choice.
It’s All about Size
The size of your shed and how much ventilation you need is the most important consideration in choosing your shed ventilation.
For example, a small solar powered vent might work for a small shed, but would be all but useless in a larger shed. By the same token, a turbine ventilator is an excellent choice for a large shed but, would provide far too much airflow for a standard backyard sized shed.
The size of your shed will help determine what option you choose and the budget you will need
Tips on Picking the Right Sized Shed Ventilation
So let's take a closer look at what you plan to use your shed for and which type of vent might be the right choice.
If all you are using your shed for is as a storage locker for tools, chemicals, and miscellaneous items, free flowing ventilation such as a skylight or gable vent might work fine. These types of ventilation will help keep the temperature down and reduce humidity.
If you plan to work in your shed, you are likely to find that some form of powered ventilation such as a solar or electric powered fan makes a better choice. These types of ventilators will push out the hot summer air and help to draw in cooler air.
Alternatively, they can also be used to bring in the warmer daytime air in the winter months, providing some much-needed warmth.
A Quick Note About Price
No matter how much most people try not to think about cost with regard to any project, it has to play a part in the final decision. In most instances non-powered ventilators are going to cost less than powered versions.
While cost will definitely play a part in your final decision, it should not be the biggest role. You need to look closely at what you intend to use your shed for along with what is stored in it. Compare this to the climate where you live and make your choice based on this information before looking at the cost.
The 5 Most Popular Shed Ventilation Options
Most of these options will be at least somewhat effective, while others will work amazingly well. There are, as you might expect, several issues you need to take into consideration when trying to decide which type of ventilation is right for your shed.
1. A Whirlybird Turbine Ventilator

A standard silver whirlybird. Courtesy of lomanco
Whirlybirds are fantastic for letting heat out.
Typically you will find them 12 inches in diameter and feature many (21 is typical) wind vanes for superior airflow.
It is built to withstand winds of up to 147 mph and requires no maintenance.
Installing is relatively stress free, all good ones come adjustable to fit roofs with a 12/12 pitch.
To adjust the whirlybirds to suit your roof angle, first sit it on your roof.
Then twist the top and the angle will change (you will need a level to make sure where you adjust it to is level – the whirlybird works best when sitting level).
All bearings should come permanently lubricated for a long worry free life.
You can use it year round to stabilize the temperature in your shed or seal it off with a plywood cover from underneath in the winter.
PROS:
- Relatively easy install
- Moves a fair amount of air
CONS:
- Can be noisy if not installed properly
- Looks ugly and sticks out on shed roof
2. Shed Cupola
A shed cupola looks a little like the cupola found on the roofs of many old church buildings, houses and barns.
The tower design with open louvers on each side lets the breeze pull hot air up and out of your shed.
With vents on all four sides, you get maximum airflow no matter which way the winds are blowing or even when there is no wind at all.
You can build your own cupola and install it yourself in just a few hours. However, because they are so visible on a roof cupolas can get quite fancy.
PROS:
- Moves a lot of air
- Looks nice if done properly on outside of shed
CONS:
- Can be expensive if you use a kit
- Installation requires some effort
Note – See our post on Shed Cupolas for more information and ideas on cupolas
You can find a great range of shed cupolas at Amazon.
3. Louver Vent

Standard Louvered Vent for a Gable – Courtesy of Duraflow
This simple louver vent can be installed on one or both ends of your shed.
They are can be installed in the gable of your shed.
Due to its location towards the peak of your roof, a gable vent allows the rising hot air to escape, leaving your shed feeling cooler
They can also be installed in walls and on doors if required. But if you are placing them low, look for screened versions to help prevent bugs entering your shed
The louvered vent helps to keep a constant flow of air through your shed and helps to reduce humidity levels.
Generally a well priced option that is both secure and low maintenance, louvered vents are a popular option for venting sheds
They are also relatively easy to install, but cutting a hole where you want the vent. Typically they just get glued to the outside siding of your shed. But you may want to reinforce the vent depending on your siding and how well you can attach it
Tip – place one vent low and one up high and create the draft that way
PROS:
- Secure way to ventilate a shed
- Looks nice and neat on outside of shed
CONS:
- Doesn't move a lot of air on its own
- Always open so can let in bugs and outside air you don't want
4. Venting Skylight

Shed Venting Skylight Courtesy of Duraflow
Typically made of hard and durable clear plastic (polypropylene), these vents not only lets the hot air out of your shed, it provides you with a little natural lighting.
They are great if you are working in your shed, and/or your shed has moisture/condensation issues
The skylight helps remove excess condensation in two ways. By heating up the shed with the light of the sun during the day, and also giving the moisture a place to go with vents underneath the top of the skylight.
Another big plus for venting skylights is there is no need for power, solar panels or any wiring. So there isn't much that can go wrong and require maintenence.
They come in a range of different sizes. Around 12-inches by 12-inches is popular for standard size sheds
And many also come with a detailed installation manual, although installation is straightforward
In a sentence, these skylights are a great way to ventilate your shed without the need for any kind of power.
PROS:
- Provides ventilation and natural light
- Available in different sizes
CONS:
- Needs to be cleaned every so often
- Will need multiple units to vent a medium to large sized shed
5. Small Solar Powered Fan

Small Solar Powered Vent Courtesy of Sunforce
A small solar powered vent is another maintenence free way to keep temperatures and humidity down in a small shed
They tend to run whisper quiet and require no wiring during installation.
Good ones use a battery backup for operation at night. And will even come with a set of rechargeable batteries and even a light
But that's where the benefits tend to stop. The real problem with these is efficiency
Because they are small they just don't move that much air and provide much ventilation.
These small fans are also relatively expensive for what you pay. The way around this is to upgrade to a high voltage system – which will cost a bit more money (upwards from about $200 USD.)
The Sunforce Solar Vent 3000 (see image) is a cheap one (see today's price here). And to be honest, it's only good for light use. Don’t expect a huge difference with a vent this size.
But again these small solar vents are a set and forget solution, and easy to install. Just drill a hole and screw it in basically.
PROS:
- Very easy installation
- Automatic solution
CONS:
- Doesn't move much air
- Pricey for what it is
6. Roof Window Vent

Roof Window Vent – Courtesy of Rion Hobby
Although these roof vents are designed to be used in a greenhouse, they can easily be adapted to use in a standard shed
The manual adjustment lets you choose how much or how little ventilation you get and the clear panel adds light to your shed.
They work exceptionally well when used in conjunction with side louvers
The benefits all center around the light the window lets in and the amount of airflow you can get with a large window
The downside is security. And because they open up such a large area, you can't really leave it open when your not around
Installation is relatively straight forward, the biggest issue being making sure the water doesn't run into the shed. A roll of flashing will help with this
PROS:
- Moves a lot of air
- Also lets in light to help remove condensation
CONS:
- Security issues with open window
- Not automated, requires you to adjust (see below for a fix)
7. Automatic Roof Vent Opener

The Automatic Roof Vent Opener at Work – Courtesy of Agriculture Solutions
If you have top-hinged windows in your shed, this great little device is the perfect way to add extra ventilation.
It is a separate arm that opens and closes as the fluid filled cylinders expand in warm temperatures and open the window.
This means there is no mains power or batteries required
The lifts are designed to lift up to 15 pounds and can be adjusted to open the window or vent at temperatures ranging from 55 to 75 degrees Fahrenheit.
The lift can be mounted on wood or metal frames, or directly to polycarbonate panels.
Because of the size of the opening and the automatic nature of the product, this will move a lot of air quickly. Helping you regulate the temperature inside your shed with ease.
PROS:
- Automated solution
- No power or solar panels required
CONS:
- Security concerns with open window
- Might take a bit of playing around to install on existing window
8. Solar Attic/Gable Roof Ventilation Fan

Solar Roof Vent Kit – Courtesy of DC HOUSE
When you plan to work in your shed during the heat of summer, you need plenty of fresh air.
These solar powered fans come in different sizes and different ratings
However these kits tend to be for larger sheds, and put in the gable. These fans also get used in attics to cool houses down in hot weather
Some things to look for when you are purchasing are the wattage, voltage and the amount of cable that comes with the unit.
Also look for adjustable solar panels and if you want a hands off option, a built in thermostat
To give you some numbers – a kit like the one pictured (Courtesy of DC HOUSE) can move up to 1,500 CFM and ventilate 2,200 square feet. Making it a great choice for larger sheds

All in One Solar Powered Fan – Courtesy of Natural Light
The fan is designed to work on low voltage, making it a good choice for cloudy days
You can get these fans in a one piece setup (see image courtesy of natural light).
They do look a little easier to install, just cut a hole in your roof and make sure it is fully covered
However they are more expensive. The ones I found were double the price on average
NOTE – The best reviews are for the 30+ watt systems
PROS:
- Moves a fair bit of air
- Can install anywhere without power
CONS:
- Can be expensive
- Can be a little tough to install
NOTE – Automatic shutters, An add on to consider for a solar fan

– Courtesy of Broan
The louvers on the automatic shutters are designed to open when the fan is turned on and close once it stops.
Once closed the louvers are weather tight for added protection
The installation is simple, cut the hole and then fix the shutters from the inside
But even though the louvers are close automatically, It isn't recommended to put it too close to the ground as bugs or rodents could force the vents open
9. Powered Shed Ventilation Fan

A Powered Shed Ventilation Fan- Courtesy of MaxxAir
If you run power to your shed already why not use a powered fan for ventilation
Typically, they are cheaper to buy than a solar powered set up and there’s no power reliability issues
You can also run them at night or when there is not enough sunlight during the day (good if your shed is shadowed by large trees)
For some more control, you can run one of these on a timer or with adjustable thermostat.
These add on extras provide more options and make it so you don't have to be in the shed to run the fan
Things to look for when purchasing are – included timers and/or thermostats, how much air they move (CFM – more the better), variable speeds and be sure to read the reviews to get an idea of how loud they run
You might also want to note which way the fan blows. Some blow air into the shed, while others blow it out
PROS:
- Cheaper than a solar solution
- Power fan will move a lot of air
CONS:
- Can be noisy depending on fan
- Requires power and timer of thermostat to control when it runs
NOTE – Thermostat An add on extra to consider for a powered fan
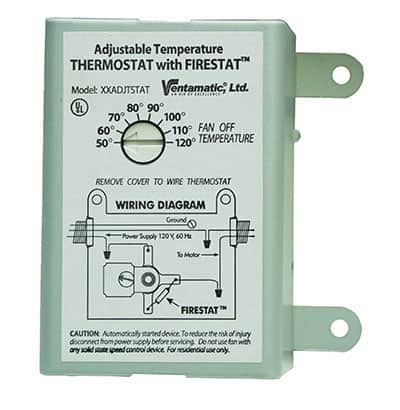
Thermostat for Powered Fan – Courtesy of Ventamatic
Some powered ventilation fans come with a built in thermostat
This is obviously the more convenient way to go but if you see a good deal, then you can add a thermostat later
The temperature ranges can be a little better on an aftermarket model (like the one pictured)
Installation does require some experience as you will have to wire it into the fan yourself – although instructions are provided
10. Insuladd Insulating Paint Additive

Paint Insulation Additive – Courtesy of Hy-Tech Thermal Solutions
While creating airflow in your shed is an excellent way to help keep it cool inside, what if you could reduce the amount of heat inside in the first place?
There are paint additives (like the one pictured) that can be added to most exterior paints.
They work by adding an insulating layer to the outside of your shed that reflects and helps to dissipate heat
This will help to reduce the temperature inside by several degrees.
Another point to note is that they can also be used on the inside to help keep heat in during the winter
PROS:
- A set and forget solution
- Can be used in combination with another solution
CONS:
- Doesn't actually ventilate your space
- You need to repaint your shed
In Summary…
No matter what you plan to use your shed for, proper ventilation and temperature control are musts
Having good airflow can keep it cooler in the summer and warmer in the winter.
It can also keep humidity under control, reducing the risk of rot and rust forming on your bikes, tools, and anything else you have stored inside.
On top of all of this, good ventilation can make your shed a great place to work on your next project.
Our suggestion is to see what you will work for your shed space. Then read the reviews and see how the solutions have worked for other people. You may even want to combine 2 solutions to get the job done
Let me know how you go by contacting me here
Thanks for reading.
Want to start a conversation and learn about other peoples experiences with ventilating sheds. Then click share below!
Related Articles: