‘The Back Saver’ Garden Bed Plans
How to Build a Tall Garden Bed Out of Stuff You Might Have Around Your Home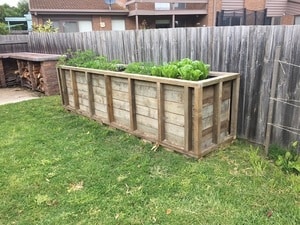
TIRED OF BACKACHES from working in the garden?
Bad back killing your chances of having the garden you have always dreamed of?
or maybe you just don't want to bend over to enjoy your garden anymore…
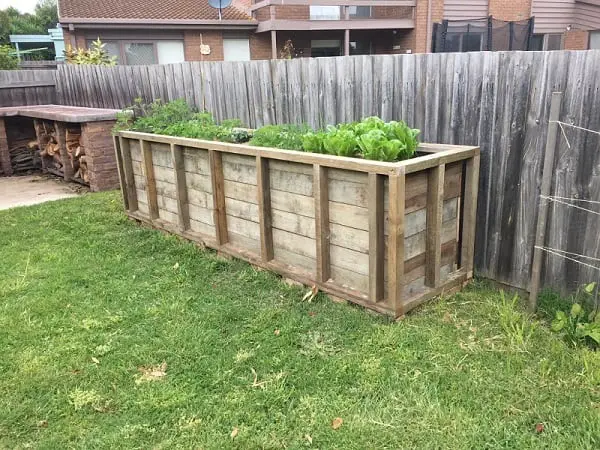
Either way, you are not alone. Thousands of gardeners of all ages (including me) suffer these same issues. One of the best solutions is the raised garden bed, which depending on the design can raise the bed up by approximately 20 to 24 inches.
This is a far more comfortable height for those with back problems to work at and is also the right height to sit in a chair, wheelchair, or power scooter as well.
Although there are a number of raised garden bed kits on the market, they tend to be a bit costly and may not be available in large enough sizes for the serious gardener. I found that not only does this design provide plenty of space, almost 12'x2.5′, but it is very sturdy and can be made using scrap lumber you probably have laying around.
Lumber and Dimensions
| Piece | Qty. | Length | Width | Height | Material |
| Rails | 20 | 780 | 80 | 50 | Pine |
| Top & Base Rails | 4 | 3560 | 80 | 50 | Pine |
| Side Rails | 4 | 700 | 80 | 50 | Pine |
| Front & Back Panels | 12 | 3400 | 140 | 25 | Pine |
| Side Panels | 12 | 650 | 140 | 25 | Pine |
| Beading (Long) | 2 | 3350 | 40 | 12 | Pine |
| Beading (Short) | 2 | 620 | 40 | 12 | Pine |
Sizes in millimeters
Other Materials Needed
- Approx. 26 bricks
- Approx. 10m of Black Plastic
- 50mm zinc coated countersink screws
- 125mm countersink screws
Tools Needed
- Circular saw (with the right blade if you choose pressure treated lumber)
- Tape measure
- Carpenter's square
- Screw gun
- Drill
- Set of drill bits
Choosing the Right Lumber
While I chose to use some older pine lumber I had laying around, you can buy all new pine lumber if you prefer. If you plan to use any type of treated lumber, be sure to use lumber that is certified as being safe for use around food plants.
Building the Frame
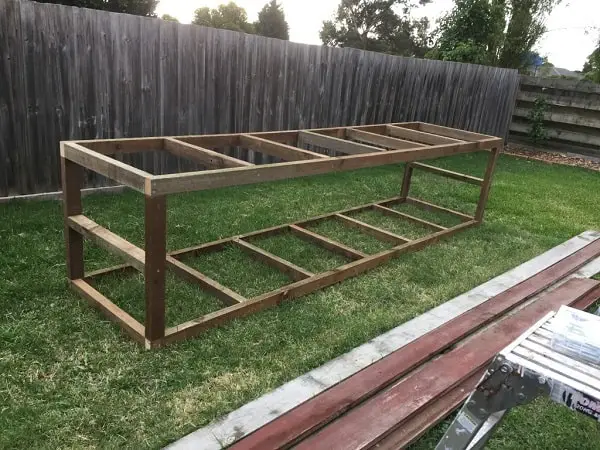
The only place you can start building this raised garden bed is by building the framework first. Be sure you have plenty of space to work in as this bed measures approximately 12 feet long by 2 1/2 feet wide and you need room to lay out the pieces as you build them.
Parts Needed:
(20) Rails 780x80x50mm
(4) Top & Base Rails 3560mm
(4) Side Rails 700x80x50mm
(Box) 125mm countersink screws
Putting the Sides Together
- Start by cutting all boards listed above to exact measurements.
- Lay out one side using rails to separate them.
- Using a carpenter's square, screw the end rails in place.
- Measure the distance between the end rails and then separate the rest of rails equidistant from each other and screw them in place.
- Continue to use a square during this process to keep the entire frame squared.
- Repeat for the other side.
Tips for Building the Side Frames
- Always measure twice and cut once, there isn't much room for error here.
- Pre-drill the primary board, this will make putting it all together easier and reduce the risks of splitting the primary board.
- If you are using pressure treated lumber, be sure you buy a saw blade that is designed for this type of wood or you run the risk of burning the lumber more than cutting it. You might also burn out the saw.
Putting the Frame Together
There are two ways you can go about putting the frame together, depending on whether you have help or not.
The Easy Way
- With one side laying flat on the ground, screw all four side rails to the corners using a level or square to keep them perpendicular to the side frame.
- Lift the side, turning it 90 degrees.
- Have a helper hold it upright or use a couple of boards to help keep it upright.
- Bring the other side up against the side rails.
- Starting with the side rails on the bottom screw the framework together.
- Double check the entire assembly for square.
- Add the two center rails in the ends.
The Hard Way
- Attach all four side rails to one of the side frame assemblies.
- Check them for square as you go.
- Have two or more assistants lift the other side rail up and hold it in place.
- Start screwing the side rails in place checking for square as you go.
- Add the two center rails in the ends.
- Roll the entire assembly 90 degrees.
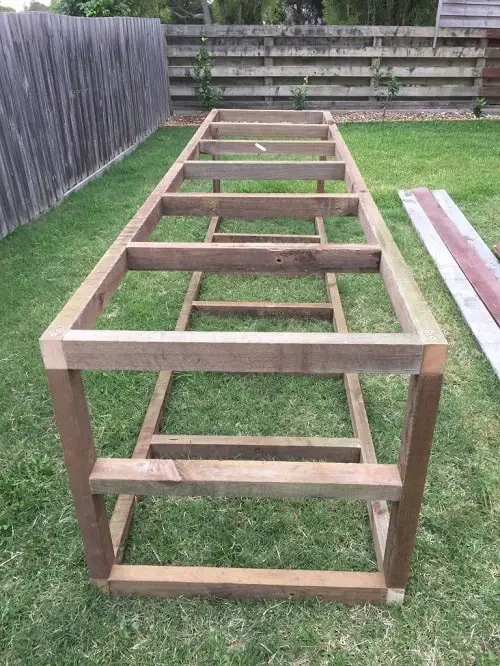
Installing the Panels
Once you have the entire frame put together, it's time to add the panels that will turn your framework into a complete box.
Parts Needed:
(12) 3400x140x25mm Front & Back Panels
(12) 650x140x25mm Side Panels
(1 box) 50mm zinc coated countersink screws
Assembly Steps
- Start with the back panels and working from the bottom up, install each panel and screw each panel to every rail for added strength.
- Repeat this process for the front panels.
- Repeat this process for the side panels completing the basic raised garden bed box.
Adding the Black Plastic Liner
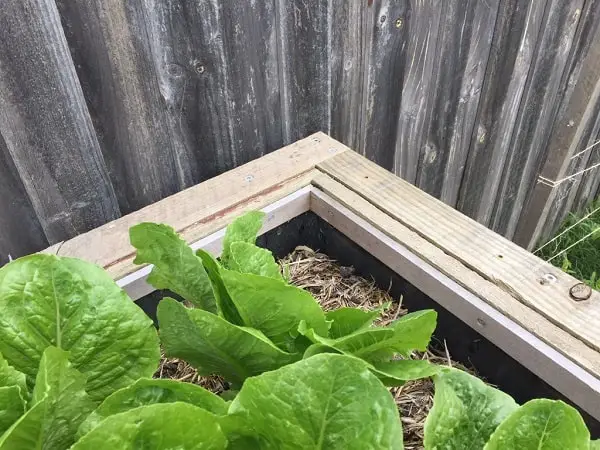
The last step in building this raised garden bed is adding the black plastic liner or base. This will be where you place the soil and grow your plants. There are two options here, the first is a shallow raised bed, which is preferred, the second is a full-depth bed that I don't advise for a couple of reasons. First, the amount of soil you would need to fill this bed all the way from the bottom to the top would be approximately 75 cubic feet, which is a lot of soil to move. Secondly, the cost of this much soil would be prohibitive.
However, if you only allow for a depth of six inches, your garden bed would only need approximately 15 cubic feet of soil, costing you far less and making it much easier to move your garden should you need to.
Parts Needed:
(2) 3350x40x12mm pine beading
(2) 620x40x12mm pine beading
(1) roll black plastic, approx. 10m
(1) box 50mm zinc coated countersink screws
(1) Staple gun with staples
Method One
(1) Decide how deep you want it to be and staple the plastic along each side of the raised garden bed. (I recommend doubling or tripling the edges for more support.
(2) Staple the ends in place next.
(3) Attach the long beads along the front and back using the 50mm screws.
(4) Attach the short beads along the sides using the 50mm screws.
Method Two
- Cut the plastic to size allowing enough extra to wrap around the beading.
- Starting with the side, wrap the plastic around the back beading and then screw it in place on the inside of the box.
- Repeat this with the front and both ends.
- This method supplies more support for the plastic, but it doesn't look quite as pretty as hiding it between the beading and the panels.
Tips
- Be sure that if you are using pressure treated lumber that it is rated as safe for use around food plants.
- Pre-drilling through the primary board first will make it much easier for you to assemble the framework. It will also help to reduce the risk of splitting the lumber you are using.
- Use the bricks to create a solid foundation for your raised garden bed to stand on.
- Level the ground you plan to use before you put your raised garden bed in place.
- You may find it easier to put the framework in place before you add the paneling as it will be much easier to move around.
- If your bed isn't level when you place it on the brick foundation, you can either dig out under one or more of the bricks or you can use wood shims to raise the bed.
- You don't need to drill holes in the plastic for drains (although it can't hurt) as in most cases as long as you are careful when watering, you shouldn't have a problem.
- When using a circular saw to cut pressure treated lumber, be sure to use a carbide tipped blade that is designed for use with this type of wood. The wrong blade could bind up in the wood and cause it to burn rather than cut. It could also burn out the motor of your electric circular saw.
Conclusion
I love my ‘Back Saving' raised garden bed, I can finally enjoy gardening without my back killing me. As long as you are a bit “handy” with tools, you can build this entire project over the course of a weekend. Push yourself a bit and you could get it done in a day. I hope this gives you a good idea of how easy it is to build a raised garden bed that will take the strain out of gardening. I had a blast building mine, I hope you enjoy building yours too.
If you build ‘the backsaver', then please let me know here, or send some images in on pinterest or facebook.